Let your ESP32 display a public network picture
This article was written 4 years ago, but its core principles (manually parsing HTTP messages) are still fully valid today. Please note that the AsyncTCP-esphome library may now have a newer version, but the logic in this tutorial regarding ‘onData’ chunking and ‘Content-Length’ parsing is fundamental to your understanding of embedded network programming.
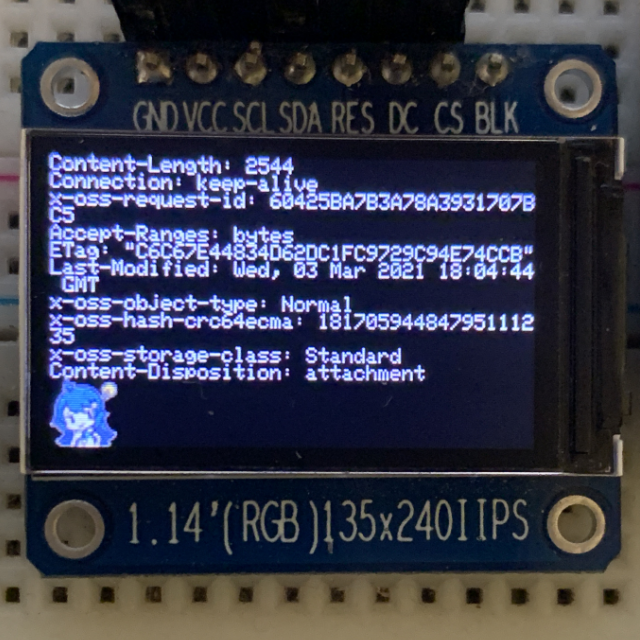
As we all know, ESP32 can be connected to the Internet, and when equipped with a screen, it can display a picture, so can it display a picture on the Internet? sure! Although before has already done video transmission, and video is just a collection of many pictures, the transmission in that article is all based on the LAN, and the communication is based on Socket. This time we need to break through the LAN and use the HTTP protocol to transmit data, so it will be more complicated than before.
preface
The network request library used is AsyncTCP-esphome, so add the following content to your platformio.ini
lib_deps =
    ottowinter/AsyncTCP-esphome@^1.1.1
    ottowinter/ESPAsyncWebServer-esphome@^1.2.7
Let’s first introduce the HTTP protocol, quoting the original text from Baidu Encyclopedia
Hypertext Transfer Protocol (HTTP) is a simple request-response protocol that usually runs on top of TCP. It specifies what kind of messages the client may send to the server and what kind of response it gets.
During this communication process, the client and the server communicate in the form of messages. The message sent by client is called The request message and the message sent by the server is called the response message.
The format structure of the request message is as follows
Request line - General headers - Request headers - Entity headers - Message body
The response message structure is as follows
Status line - General headers - Response headers - Entity headers - Message body
After knowing the message format and parsing the message, we can get the content we want.
Let’s use an exercise to study the content of the message, and then do subsequent development.
drill
For this exercise, I uploaded a small JPG image to Alibaba Cloud OSS. With Alibaba Cloud OSS, this image has a fixed public network address.

Next, open Postman, fill in the image address, keep the request header parameters as default, then send the request, directly view the Postman console, and click Show raw log to view the original request log.
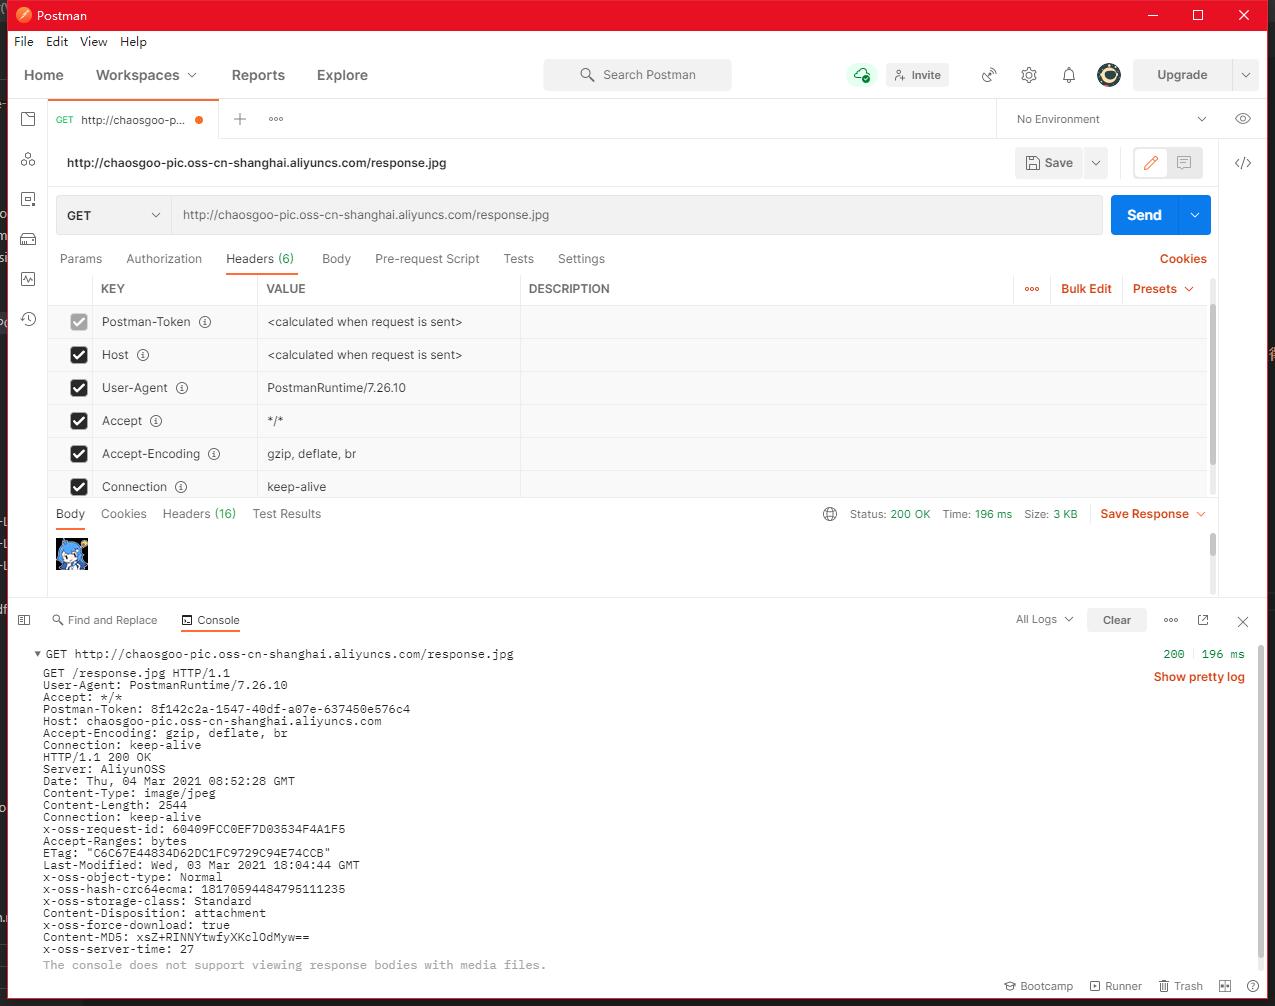
The request message is as follows
GET /response.jpg HTTP/1.1
User-Agent: PostmanRuntime/7.26.10
Accept: */*
Postman-Token: 8f142c2a-1547-40df-a07e-637450e576c4
Host: chaosgoo-pic.oss-cn-shanghai.aliyuncs.com
Accept-Encoding: gzip, deflate, br
Connection: keep-alive
The structure of the request message is as shown in the figure
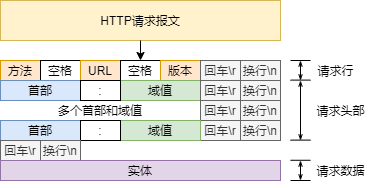 The content that needs attention in the request message is:
| Contents | Remarks |
|---|---|
| GET /response.jpg HTTP/1.1 | Request line, consisting of method field, URL field and HTTP protocol version field |
| … | … |
| Host: chaosgoo-pic.oss-cn-shanghai.aliyuncs.com | Requested host name and port number |
| … | … |
It can be found that the content in the table is constructed from the links of the pictures.
Take another look at the response message. The structure of the response message is as shown in the figure.
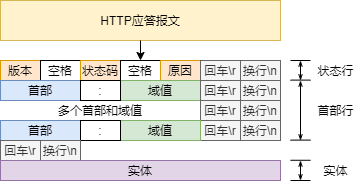
The response message is as follows
HTTP/1.1 200 OK
Server: AliyunOSS
Date: Thu, 04 Mar 2021 08:52:28 GMT
Content-Type: image/jpeg
Content-Length: 2544
Connection: keep-alive
x-oss-request-id: 60409FCC0EF7D03534F4A1F5
Accept-Ranges: bytes
ETag: "C6C67E44834D62DC1FC9729C94E74CCB"
Last-Modified: Wed, 03 Mar 2021 18:04:44 GMT
x-oss-object-type: Normal
x-oss-hash-crc64ecma: 18170594484795111235
x-oss-storage-class: Standard
Content-Disposition: attachment
x-oss-force-download: true
Content-MD5: xsZ+RINNYtwfyXKclOdMyw==
x-oss-server-time: 27
##The console does not support viewing response bodies with media files.
There are a lot of things that you don’t need to pay attention to now. You only need to care about the contents in the table below.
| Contents | Remarks |
|---|---|
| HTTP/1.1 200 OK | Status line, consisting of protocol version, status code and reason phrase |
| … | … |
| Content-Type: image/jpeg | Entity’s media type |
| Content-Length: 2544 | The length of the entity, here is the size of the JPG image |
| … | … |
With the status line, we can know whether the request is successful; with Content-Length, we can know the size of the target image.
The subsequent operation is to parse the message first, and then determine whether the request is successful based on the request line. If successful, continue to parse the response header and obtain the size of the image. If not, then slowly debug.
Once everything is ready, you can start reading the rest of the content.
Since the entity may not be transmitted at once during the transmission process, the entity will be divided into many small chunks and sent. Use extractBodyChunkFromResponseRaw to extract the entity and return the extracted length.
The previous **client->onData([&] (void arg, AsyncClient c, void *data, size_t len) will be called many times.
The data in onData is the part of each data frame minus the frame header and frame tail, which is the small block into which the entity is divided.
Since it is transmitted through TCP, there is an upper limit on this size. If you use Arduino to develop ESP32, the value of MSS will be set to 1436.
I am honored to be able to observe this phenomenon and feel like I can touch MTU
code time
Request some code
For the code of network request operation, please refer to ESP32 asynchronous network requests. This article only focuses on the response message processing function.
##include <Arduino.h>
##include <AsyncTCP.h>
##include <TFT_eSPI.h>
##include <TJpg_Decoder.h>
##include <WiFi.h>
##include <Wire.h>

##define ssid "XXXX"
##define password "XXXX"
// 显示sprite的内容
TFT_eSPI tft;
// 图片绘制的Sprite
TFT_eSprite imageSprite = TFT_eSprite(&tft);
// 应答报文的Sprite
TFT_eSprite headerSprite = TFT_eSprite(&tft);

WiFiClient client;

// 待显示图片尺寸
uint16*t imageSize;
// 已经下载的实体尺寸
uint16_t readBytesSize = -1;
// 图片缓存, 限制大小为16KB,你也可以设置成其他尺寸。
uint8_t \_imageBuffer = (uint8_t *)heap_caps_malloc(16 \* 1024, MALLOC_CAP_8BIT);
// 两张sprite的偏移
int16_t headerSpriteOffset = 0;
String header;
enum ParseState {
PARSE_REQ_START,
PARSE_REQ_HEADERS,
PARSE_REQ_BODY,
PARSE_REQ_END,
PARSE_REQ_FAIL,
PARSE_REQ_PENDING
};

ParseState \_parseState;
/\*\*

- @brief 从初次原始报文中提取Content-Length
- @param responseBody 原始报文
- @param bodyBeginIndex body起始索引
- @return 无
  \*\*/
  uint16_t extractContentLengthFromResponseRaw(String &responseBody,
  uint16_t &bodyBeginIndex) {
  int index = responseBody.indexOf("Content-Length:");
  int eIndex = responseBody.indexOf('\n', index);
  String value = responseBody.substring(index + 16, eIndex);
  bodyBeginIndex = responseBody.indexOf("\r\n\r\n") + 4;
  return atoi(value.c_str());
  }

/\*\*

- @brief 深度复制bytes
- @param buffer 目标的容器
- @param source 原始内容
- @param length 数据长度
- @param SrcOffset 原始内容的读取偏移
- @param bufferOffset 目标的容器的写入偏移
- @return 处理的数据长度 \**/
  size_t copyBytes(uint8_t *source, uint8*t \_buffer, size_t length,
  size_t SrcOffset, size_t bufferOffset) {
  size_t count = 0;
  while (count + SrcOffset < length) {
  *(buffer + count + bufferOffset) = source[count + SrcOffset];
  count++;
  }
  return count;
  }

/\*\*

- @brief 从初次原始报文中提取Content-Length
- @param frameData 原始报文
- @param bodyData body数据容器
- @param length body数据长度
- @param offset body数据起始索引
- @return 处理的body长度 \**/
  uint16_t extractBodyChunkFromResponseRaw(uint8_t *frameData, uint8_t \*bodyData,
  uint16_t length, uint16_t srcOffset,
  size_t bufferOffset) {
  copyBytes(frameData, bodyData, length, srcOffset, bufferOffset);
  return length - srcOffset;
  }

void asyncReqeust() {
static AsyncClient *aClient;
if (aClient) {
// aClient already exists
// aClient 繁忙
return;
}
aClient = new AsyncClient();
if (!aClient) {
// could not allocate aClient
// aClient 无法创建
return;
}
aClient->onError(
[&](void *arg, AsyncClient *client, int error) {
Serial.println("getImageAsync:Connect Error");
aClient = NULL;
delete client;
},
NULL);
// 请求的回调
aClient->onConnect(
[&](void *arg, AsyncClient *client) {
Serial.println("getImageAsync:Connected");
aClient->onError(NULL, NULL);
// 连接断开的动作
client->onDisconnect(
[&](void *arg, AsyncClient *c) {
// status = 3;
aClient = NULL;
delete c;
Serial.printf("getImageAsync:Disconnected\n");
\_parseState = PARSE_REQ_START;
},
NULL);
// 接收到服务器数据时候的动作
client->onData(
[&](void *arg, AsyncClient *c, void *data, size*t len) {
uint8_t \_d = (uint8_t *)data;
// \_parseState为解析状态枚举类型
if (\_parseState == PARSE_REQ_START) {
String content = String((char \*)data);
\_parseState = PARSE_REQ_HEADERS;
uint16_t bodyBeginIndex = 0;
// 从响应头中获取长度
imageSize = extractContentLengthFromResponseRaw(content,
bodyBeginIndex);
Serial.printf("Content-Length:%d\n", imageSize);
header = content.substring(0, bodyBeginIndex);
if (imageSize > 0) {
\_parseState = PARSE_REQ_BODY;
readBytesSize = extractBodyChunkFromResponseRaw(
d, imageBuffer, len, bodyBeginIndex, 0);
}

              } else if (_parseState == PARSE_REQ_BODY) {
                readBytesSize += extractBodyChunkFromResponseRaw(
                    d, imageBuffer, len, 0, readBytesSize);
                Serial.printf("extract size:%d\n", readBytesSize);
              }
              if (readBytesSize == imageSize) {
                // 接收完成
                Serial.printf("Body Received Done.received %d bytes\n",
                              readBytesSize);
                // for (int i = 0; i < imageSize; i++) {
                //   Serial.write(*buffer + i);
                // }
                // Serial.println();
                _parseState = PARSE_REQ_END;
              }
            },
            NULL);
        // 发送请求
        client->write(
            "GET /response.jpg HTTP/1.1\r\n"
            "Host: chaosgoo-pic.oss-cn-shanghai.aliyuncs.com\r\n"
            "Accept: */*\r\n"
            "Accept-Encoding: gzip, deflate, br"
            "Connection: keep-alive"
            "User-Agent: PostmanRuntime/7.26.10\r\n\r\n");
      },
      NULL);

if (!aClient->connect("chaosgoo-pic.oss-cn-shanghai.aliyuncs.com", 80)) {
Serial.println("Connect Fail");
AsyncClient \*client = aClient;
aClient = NULL;
delete client;
}
}

// JPG解码绘制回调
bool drawCallback(int16_t x, int16_t y, uint16_t w, uint16_t h,
uint16_t \*bitmap) {
if (imageSize == readBytesSize) {
if (y >= 135) {
return true;
}
imageSprite.pushImage(x, y, w, h, bitmap);
}
return true;
}

// 推送到屏幕
void pushToTFT(int offset) {
headerSprite.pushSprite(0, offset);
imageSprite.pushSprite(0, offset + 135);
}

void setup() {
Serial.begin(115200);
client.setTimeout(1);
WiFi.begin(ssid, password);
WiFi.setAutoReconnect(true);
// 初始化屏幕
tft.init();
// 旋转屏幕方向,从竖变为横向
tft.setRotation(1);
// 清空屏幕内容
tft.fillScreen(TFT_BLACK);
// 创建Sprite
imageSprite.createSprite(240, 32);
headerSprite.createSprite(240, 135);
// 配置TJpeg
TJpgDec.setJpgScale(1);
TJpgDec.setSwapBytes(true);
// 设置TJpg解码器回调函数
TJpgDec.setCallback(drawCallback);
delay(3000);
asyncReqeust();
}

void loop() {
if (\_parseState == PARSE_REQ_END) {
TJpgDec.drawJpg(0, 0, imageBuffer, imageSize);
\_parseState = PARSE_REQ_PENDING;
headerSprite.setTextFont(1);
headerSprite.setTextColor(TFT_WHITE);
for (int i = 0; i < header.length(); i++) {
headerSprite.print(header[i]);
Serial.print(header[i]);
headerSprite.pushSprite(0, 0);
}
}
pushToTFT(headerSpriteOffset);
delay(100);
if (headerSpriteOffset > -32) {
headerSpriteOffset -= headerSprite.fontHeight(1);
}
}
[env:pico32]
platform = espressif32
board = pico32
framework = arduino
monitor_speed = 115200
lib_deps =
adafruit/Adafruit BusIO@^1.6.0
adafruit/Adafruit GFX Library@1.10.3
bodmer/TFT_eSPI@^2.3.41
ottowinter/AsyncTCP-esphome@^1.1.1
ottowinter/ESPAsyncWebServer-esphome@^1.2.7
bodmer/TJpg_Decoder@^0.1.0